


© 2012 Blake Stokes


Hydroponics
Supplies
20 gallon Aquarium
1 Aquarium Stand
1 can Black Spray Paint
1 roll Contact Paper
1 Air Pump
1 Air Stone
1 package of Airline Tubing
1 sheet of Styrofoam
10 3 inch Netpots
1 bag of hydroponics substrate
Hydroponic Nutrients & Supplements
10 seedlings of choice
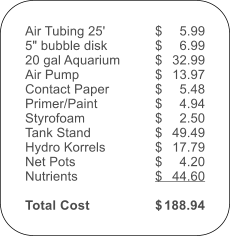
Click for Price Breakdown
Directions
Before you begin, you have to start with some pre-sprouted seedlings. We used one like this. Let them grow for a few
weeks following the directions that it comes with, and you'll be set to go.
Clean your aquarium to get rid of any grime, residues, or just plain dirt that is on it, inside and out. Take your can of
spray paint and spray down all sides of the aquarium, making sure to get it completely covered but getting none on
the inside. Let dry, apply another coat, and then let it dry again.
While that dries completely, work on the Styrofoam. Cut a piece that is big enough that it fills the top of the aquarium,
but not so big that it can't float on top of the water. Once you have it the proper size, cut out holes in the top for the
net pots, and a smaller one for the tube for the aerator. They need to fit in there snugly.
By now, the paint should be dry, so you can move on to the fun part: the contact paper. It is quite tricky, at least it was
for me, and you need to be careful. Not only can it rip off the paint if you do it wrong, this is also the step that makes
sure the roots have complete, or almost complete darkness so they can grow properly. Apply the contact paper the
exact same way you would with wall paper. It doesn't have to be smooth, exactly, just block out all or most of the
light.
Fill with water while the Styrofoam you cut out earlier is in place, keeping track of how many gallons you put inside.
Look up the directions for how much of your nutrients you need to put in for a drain-to-waste system and put in the
amount it says per gallon, starting on week one. Put your started plants in the net pots and fill them with the
aggregate. Place the filled net pots in the Styrofoam. Make sure to replace the water once a week and change the
amount of nutrients as needed. You now have a fully functioning hydroponic garden.

Your own Hydroponics Bay for under $200